It's no secret that of all the aspects of what I do, photo editing is my least favourite. I have images from 2005 still waiting to be edited, because I'd much rather be out in the field, researching background information, working out, eating, or even sleeping.
Lately though, I've had to spend more time editing in order to prepare presentations, proposals and talks.
The following image is an example...me holding a piece of sperm whale skin...not a beauty photo per se, but great for talks.
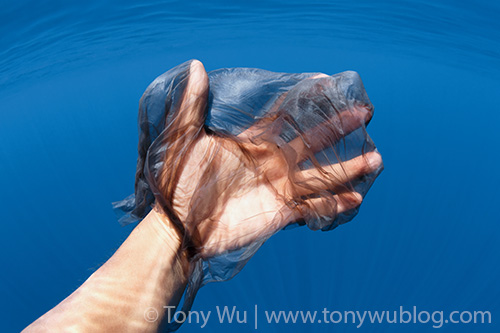
Sperm whale skin, aka odontocete dandruff
When I say "editing", I'm not talking about prepping a file for web use. That's a piece of cake. Move a few sliders around, pump out a jpg, and Bob's your uncle.
I'm talking about editing in order to have files that are clean and CMYK print-ready, which is a whole 'nother ball game, especially when blue water is involved.
Anyway, I don't want to get sidetracked on that issue. What I'd like to do is share some quick tips for a few things I've figured out over the past several weeks of (somewhat) concentrated editing.
Let me preface by reiterating that I am not by any means a skilled user of Photoshop or other editing tools. I am more on the "dunce" end of the spectrum than the "grand wizard" side.
So basically, if I can do the following stuff, anyone can. (I was tempted to write: "If Wu can do it, so can you" but that would be too corny, huh? And I really don't want to risk pissing off Martin Yan, whom I love.)
These tips are based on the assumption that you capture RAW files (solid whack upside the head if you don't) and are using Photoshop. I use Aperture to organise my files, but I do not do any serious editing with it.
Tip 1: Open Your Files as Smart Objects
This one small discovery immediately made my life a heckuva lot better. When you first open a RAW file, the dialogue box gives you the option opening the file as a Smart Object.
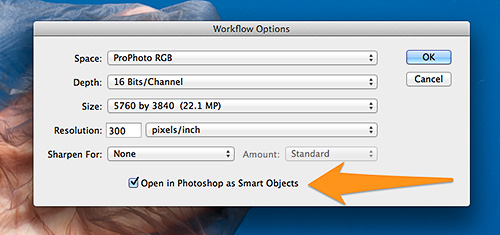
Open your RAW files as Smart Objects in Photoshop
Why should you do this? Once you open the file, you can double click on the layer in your Layers panel, and the Camera RAW dialogue will re-open with the settings you used.
So say you accidentally set the Exposure setting at -1.0, when you meant -0.1. If you didn't use Smart Objects, you'd need to close the file and re-open from the RAW file. With Smart Objects, just double click the layer, and you're back to where you started, so you can readjust and be on your way.
More importantly, you can keep doing this, even much farther into editing, so long as you are editing on a Smart Object and maintain a chain of Smart Objects (duplicate layers as Smart Objects).
2. Tip 2: Use Nik Dfine 2.0 and Sharpener Pro 3.0
I tried many variations of using the noise reduction and RAW sharpening dialogues in Camera RAW, but heck if I could work out what to do. I have better things to do than wing sliders around 'til I'm blue in the face.
So what I've settled upon is to use no noise reduction or sharpening in Camera RAW (actually slide everything to zero), and instead duplicate my original Smart Object layer and immediately apply Nik Dfine 2.0 and Sharpener Pro 3.0.
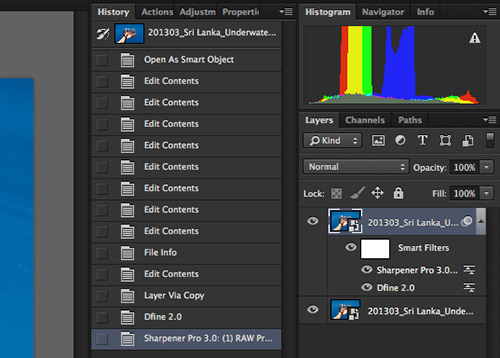
Duplicate original layer, apply Nik Dfine 2.0, Sharpener Pro 3.0
It's not necessary to duplicate the original layer. You can apply the filters to the original. I just like to keep things tidy.
I've found that the default settings for Dfine 2.0 and the RAW Sharpener in Sharpener Pro 3.0 usually do a great job of reducing noise and applying initial sharpening. Occasionally I have to fiddle, but not nearly as often as I'd need to do if I tried using Camera RAW for noise reduction and initial sharpening.
Here's the kicker.
Let's say I step away from my computer for some coffee, come back wide awake, and realise that I flubbed an initial setting in RAW conversion.
All I need to do is double click my original layer, and the Camera RAW dialogue comes up. I make my adjustments, hit go, and the changes carry through, including through the Nik filters that I've just applied.
See why this is oh-so-cool-and-useful? Like magic.
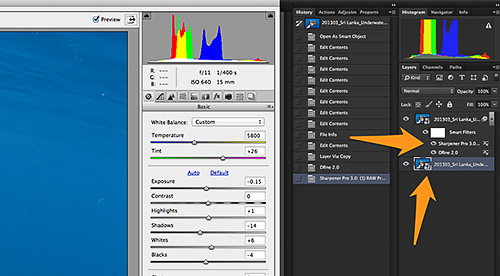
Open Smart Object, get back to original Camera RAW dialogue
Tip 3: Apply More Nik Filters on Smart Objects
Due to my non-love for editing, I do my best to get as close to spot-on with exposures, framing, etc. as possible in-camera. If there's too much work involved, I'm not going to attempt the edit.
So in practicality, most of the edits I need to do can be achieved through using other Nik Filters, again on Smart Objects.
Remember that if you use any of the Nik Filters on Smart Objects, you can always double click on the filter and re-do it.
Plus...pay attention to this one...Nik Filters have a built-in way for you to achieve masking without actually needing to worry about masking.
As an example, one of my favourite filters is Pro Contrast in Nik Color Efex Pro 4.
Here is the dialogue for this filter after I've applied just a tiny bit of Dynamic Contrast, 4% to be exact:
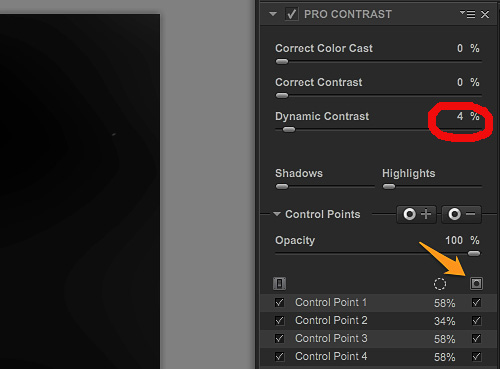
Pro Contrast, Nik Color Efex Pro 4
I generally keep the tweaks to a minimum. We're really talking about tweaking the finer points of an image, not trying to give birth to a FrankenPhoto.
The arrow in the screenshot above points to the checkbox that allows you to see where the Control Points are taking effect. It's not my intention here to discuss the ins and outs of Nik's Control Points (refer to Nik's website for tutorials), but they basically make it easy to select where you want effects to be applied, and where you don't, i.e., masking for dummies like me.
So, to get to the main point...the reason this is important for underwater photos...is that I don't want contrast in the blue water. Excessive contrast isn't true-to-reality, and will also totally destroy an image for CMYK print.
I cringe every time I see blue-water backgrounds blown to oblivion due to excessive contrast and/ or saturation.
Controlling the blue while accentuating the main subject is certainly possible just using Photoshop...but it's not easy. I know people who can do it, but I can't.
Anyway, here's an idea of what the Control Points allow you to do, with that checkbox above clicked so I can see what I'm doing:
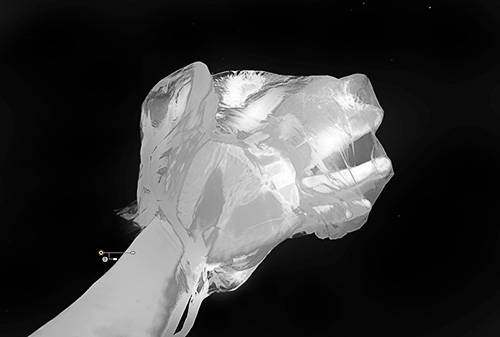
Nik Control Points in Color Efex Pro 4
The Pro Contrast filter is affecting the white areas, but not the black zones. You can also adjust how much of the effect goes through to selected areas by adjusting the Opacity of Control Points. Couldn't be easier, really.
The main drawback for all this is that using Smart Objects and applying Nik Filters as Smart Filters (which is what you do when you use them on Smart Object layers) requires computational power.
I have 16GB of RAM on the machine I use for editing, and don't have any other software open when I edit, so things go smoothly.
File sizes can get large too, so you need plenty of hard disk storage space as well.
BTW, Google bought Nik recently. One of the changes is that the entire suite of Nik Filters is available for US$149 (70% off the original price), which is a bargain for the editing power they give you. See the Nik Software website for details.
Disclosure: I received promotional access to the filters, but otherwise receive nothing from Nik or Google. I love the filters and use them constantly.